All editions for the Quick capture menu and tap-to-focus; the fuller viewfinder with zoom presets, Send To and Camera settings needs Standard, Lite, Photos or Legacy; video, the Photo/Video switch and the Samsung-style gestures are Standard only; the watch live view needs Standard or noLegal
Taking Quick Photos and Video Snaps
Open the app's own camera from the Programs menu for a quick photo or video snap, get to know its viewfinder and gestures, record video with a timer and Pause/Resume, and even watch through your phone's camera from a paired watch.
Why You'll Love This
Your phone already has a camera app, so why does FastMediaSorter carry its own? Because a quick snap deserves to land straight in your Pictures folder without switching apps, and because the app's camera can do a few things the stock one never will - like showing you exactly what you're about to save before you save it, or letting your watch peek through it.
Open it from the Programs menu, take the photo or the clip, and you're back in the app a second later. This page is the tour of the viewfinder, the gestures, video recording and the watch trick. The deeper controls - lenses, zoom range, shooting profiles and the full settings dialog - are one page over, in Lenses, Zoom, Shooting Profiles and Camera Settings.
- FastMediaSorter in any edition. The fuller viewfinder (zoom presets, Send To, Camera settings) needs Standard, Lite, Photos or Legacy; video recording and the Samsung-style gestures need Standard.
- Camera permission, and microphone permission if you plan to record video with sound. Android asks the first time you need either.
- For the last step only: a paired watch and a phone on the Standard or noLegal edition.
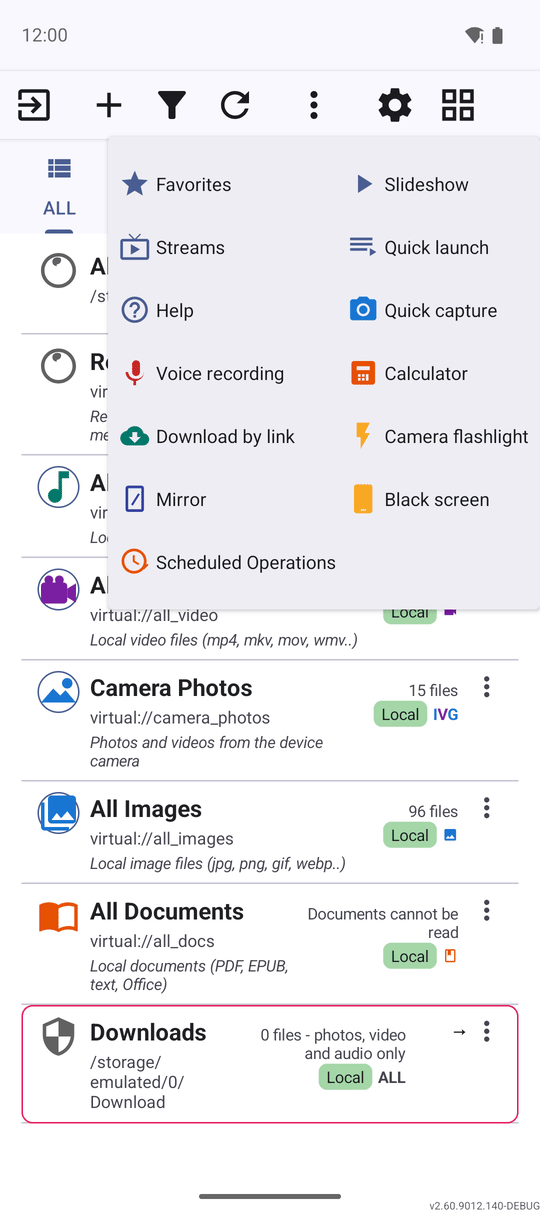
Open Quick capture from the Programs menu
On the main screen, open the Programs menu. Near the top you see "Quick capture" and "Voice recording" - tap either one and the camera or the recorder opens right away, no stutter while it starts up.
Photos, videos and voice notes each save straight into the phone's standard Pictures, Movies or Recordings folder. This is different from Take photo in the file browser's three-dots menu, which saves into whatever resource you have open instead - see Taking Photos, Videos and Voice Notes Straight into a Folder for that version.
Photo, video and voice capture are each their own switch in Settings, so an edition without video simply doesn't show that row. Press and hold a row to Remove it from the menu if you never use it.
Get to know the viewfinder
*Standard, Lite, Photos and Legacy editions.* Open the camera and the viewfinder appears immediately - it no longer needs a beat to warm up the lens first.
A zoom row sits under the frame with ready presets from 0.5x to 30x plus a slider you can drag for anything in between; at a lens's own maximum you see "Zoom 3x, optical limit" instead of a number that would just crop in digitally. The controls stay fixed in place while you turn the phone - only their icons rotate to match - and a small label tells you exactly where the shot is about to be saved.
If the app opened the camera for something specific, such as recognizing text, a line above the zoom row names the scenario, for example "Text recognition". For a plain photo or video, nothing is shown there.
In-app camera open on a resource, zoom row and fixed controls visible, no dialog open.
Switch mode and move around with gestures
*Standard edition.* A Photo / Video switch sits right in the viewfinder, and the shutter itself changes shape depending on which mode you're in - and again once a recording starts - so it's always obvious what a tap will do.
The viewfinder reads gestures the way a modern phone camera does: pinch to zoom in or out, double-tap to jump between two zoom levels, swipe up or down to switch lens, and swipe left or right to switch between Photo and Video. While it swaps lenses you see "Switching.." for a moment.
In-app camera, Photo/Video switch visible, Video side highlighted.
Tap to focus and set the exposure
Tap anywhere on the viewfinder and the camera focuses and meters exposure right at that spot, with a focus ring drawn exactly where you tapped - not somewhere near it. This works the same way in every edition.
In-app camera, focus ring shown at a tapped point off-center in the frame.
Record a video, with sound or without
*Standard edition.* Switch to Video and a Microphone toggle appears; turn it off and the control bar shows "Recording without sound" so you always know whether audio is being captured.
While recording, a timer counts up on screen with its own Pause and Resume, so a video call ringing in the middle of a shot doesn't force you to start over - stop, resume, and both halves land in the same file.
In-app camera, Video mode, recording in progress, timer and Pause/Resume control visible.
Shoot several photos in a row, accurately
*Standard edition.* The camera doesn't close after one shot the way many camera apps do - it stays open so a burst of photos is just tap, tap, tap. A thumbnail of your last shot appears on the control bar; tap "View last capture" and it opens in the app's player right away, so you can check focus and framing without leaving the camera.
Whatever the viewfinder shows at the moment you press the shutter is what gets saved - true at any zoom, even past a lens's own optical limit, and for every aspect ratio you pick, in every edition.
On Standard, Lite, Photos and Legacy, when your chosen aspect is narrower than the full preview, a frame drawn over the viewfinder marks exactly what will be kept, so there's no surprise cropping later. Your aspect choice is remembered the next time you open the camera, and digital zoom is cropped into the saved video file itself, not just shown zoomed on screen.
In-app camera, control bar with the last-capture thumbnail visible after a shot.
Send the shot on, or open Camera settings
*Standard, Lite, Photos and Legacy editions.* Tap "Send to.." to hand your latest capture to another app right from the camera, without hunting for it in a folder first.
The gear icon opens Camera settings: self-timer, grid, aspect ratio, resolution, exposure, white balance, manual ISO and shutter, and HDR - only the rows your phone's hardware actually supports. The full tour of that dialog, plus lenses and shooting profiles, is in Lenses, Zoom, Shooting Profiles and Camera Settings.
One more toggle lives in Settings, the Management tab, under Photography: Geotag photos - "Save GPS location in photos taken with the in-app camera. Needs location permission; off by default." It never holds up the shutter waiting for a GPS fix - if none is available yet, the photo just saves without one.
In-app camera control bar, Send to.. and the settings gear icon both visible.
Look through the phone camera from your watch
*Standard and noLegal editions, with a paired Wear OS watch.* On the watch, open "Phone camera" - "Watch what your phone sees, over Wi-Fi" - and tap Start. The watch shows "Asking the phone.." while a notification titled "Your watch wants to see this camera" appears on the phone; tap Allow there.
The watch now shows the live picture from the phone, plus a "Cameras" list so you can switch between the phone's back and front camera without touching the phone at all. Tap Stop on either device to end the session.
If it can't connect, the watch says why instead of just hanging - for example "Turn on Wi-Fi on the watch", "This Wi-Fi is too slow for video" or "The request was declined on the phone". Pairing the watch itself is covered in Installing on Wear OS and Pairing with Phone.
Watch screen, phone camera live view active, Cameras list and Stop control visible.
What You Get
The quick photo is already in your camera roll, the clip you recorded is in Movies, and you never had to leave FastMediaSorter to take either one. On the watch, you got a look through the phone's lens without picking the phone up at all.
Tips and Troubleshooting
- Your files are already named for you. Captures get a source prefix plus the exact time -
photo_260924_143210.jpg,screenshot_..,audio_..,video_..,screen_video_..- and if two would land with the same name, the second one gets " (2)" added automatically. Nothing overwrites anything by accident. - The quick-access panel can start these too. If you've set up the app's on-screen quick-access panel, quick photo capture, voice recording and screen recording can live there as one-tap tiles - see Screen-Edge Gestures and the Quick-Access Panel.
- Want the shot saved somewhere specific instead of the camera roll? That's the file browser's own Take photo, covered in Taking Photos, Videos and Voice Notes Straight into a Folder.